


OS Installation Extension
- About
- Features
- Supported Operating Systems & Utilities
- Server Configuration
- Remote Provisioning Submodule
- Provisioning Templates
- Provisioning Profiles
- Provisioning Variables Reference
- RAID Partitioning
- ISO Images
- Basic configuration
- Provisioning Status
- Provisioning History
- Archived Templates
- Extension Configuration
About
OS Installation For EasyDCIM extension allows to install operating systems on any existing in EasyDCIM physical server with the help of adequate submodules.
Features
- Install And Configure Multiple OS Automatically
- Create And Customize Predefined OS Installation Templates
- Create/Edit/Synchronize OS Installation Addons:
- Disk Layout
- Post Installation
- First Boot
- Automatic Installation And Configuration Of DHCP Server Based On Module Configuration
- Advanced Integration With IP Address Management Extension
- Legacy BIOS And UEFI Mode Support
- Automatic Device Boot Into PXE Mode Using IPMI
- Automatic Device Restart Using IPMI And PDU
- Display Of Current Operating System Installation Status
- Cache System For Installation Templates
- Record Of Completed Installations Along With Installation Logs
- iPXE Startup File Placed Automatically In Dedicated Server Memory
- Built-in DHCP And TFTP Server
- Definition Of License Key For Windows
- Installation And Configuration Of SAMBA Server
- Run Rescue Mode Both From Back-End And Client Area Sections
- Automation Of Operating System Installation Process:
- Downloading System Files
- Setting System Language
- Setting Time Zone
- Creating Standard User Account
- Setting Password For New User Account
- Setting SSH Keys For New User Account
- Hard Disk Partitioning
- Setting Root User Password
- Setting Primary IP Address
- Setting Additional IP Addresses And Network Interfaces
- Installation Of Additional System Packages
- Running First Boot Scripts - CentOS/Debian
- Running Post-installation Scripts
- Finishing Installation
- Sending Confirmation Email To Client And Administrator Along With Login Data
- Supported First Boot Installation Addons - CentOS 7:
- CentOS Web Panel
- cPanel
- DirectAdmin
- Plesk
- Vesta Control Panel
- Supported Disk Layout Addons - CentOS 6/7/8:
- RAID1 with 2 disks
- RAID1 with 4 disks
- RAID1 with 6 disks
- RAID1 with 8 disks
- Test Connection
- Manage ISO Files For Manual Installation
- Enable/Disable Specific Submodules
- Create Own Submodules
- Manage OS Templates:
- Add/Edit/Delete Templates
- Define Template For Chosen Connection
- Synchronize Templates
Supported Operating Systems & Utilities
EasyDCIM supports a wide range of Linux, Windows, Unix, and rescue environments, enabling fully automated server provisioning, recovery, diagnostics, and secure disk operations.
Linux Distributions
- AlmaLinux 8, 9, 10 (latest)
- CentOS 6, 7, 8, 9 (latest)
- CentOS Stream 8, 9, 10 (latest)
- CloudLinux 8, 9 (latest)
- Debian 9 Stretch, 10 Buster, 11 Bullseye, 12 Bookworm, 13 Trixie
- Fedora Server 41, 43
- Oracle Linux 8, 9, 10 (latest)
- Proxmox VE 8.x, 9.x
- Rocky Linux 8, 9, 10 (latest)
- Ubuntu LTS 20.04, 22.04, 24.04
- VzLinux 8 (latest)
- VMware ESXi 7.0b, 8.0
Windows Operating Systems
- Windows 10 (April 2018)
- Windows Server 2025, 2022, 2019, 2016, 2012 R2, 2008 R2
Unix Systems
- FreeBSD 13
Rescue & Utility Systems
- Clonezilla 3.2.1-9 – Disk imaging and cloning solution
- Detect Hardware – Automatically detects installed server hardware
- GParted 1.7.0 – Graphical disk partition editor
- Hiren’s BootCD 15.2 – Diagnostic and system recovery toolkit
- Hiren’s BootCD PE 1.0.2 – Windows PE–based rescue environment
- Memtest86+ 5.31b – RAM diagnostics and memory testing tool
- SystemRescueCd 8.0.4 / 9.0.4 – Linux-based system recovery and repair
- Wipe Hard Drive – Full and secure disk wipe with bad sector verification
- Quick Wipe Hard Drive – Fast disk cleanup (partition tables and boot data)
Server Configuration
To add a new server to EasyDCIM, click Add Server in the server list view.
In the creation form, provide the following information:
- Server Name – a human-readable name used to identify the server in the panel
After completing the form, click Add Server to save the entry.
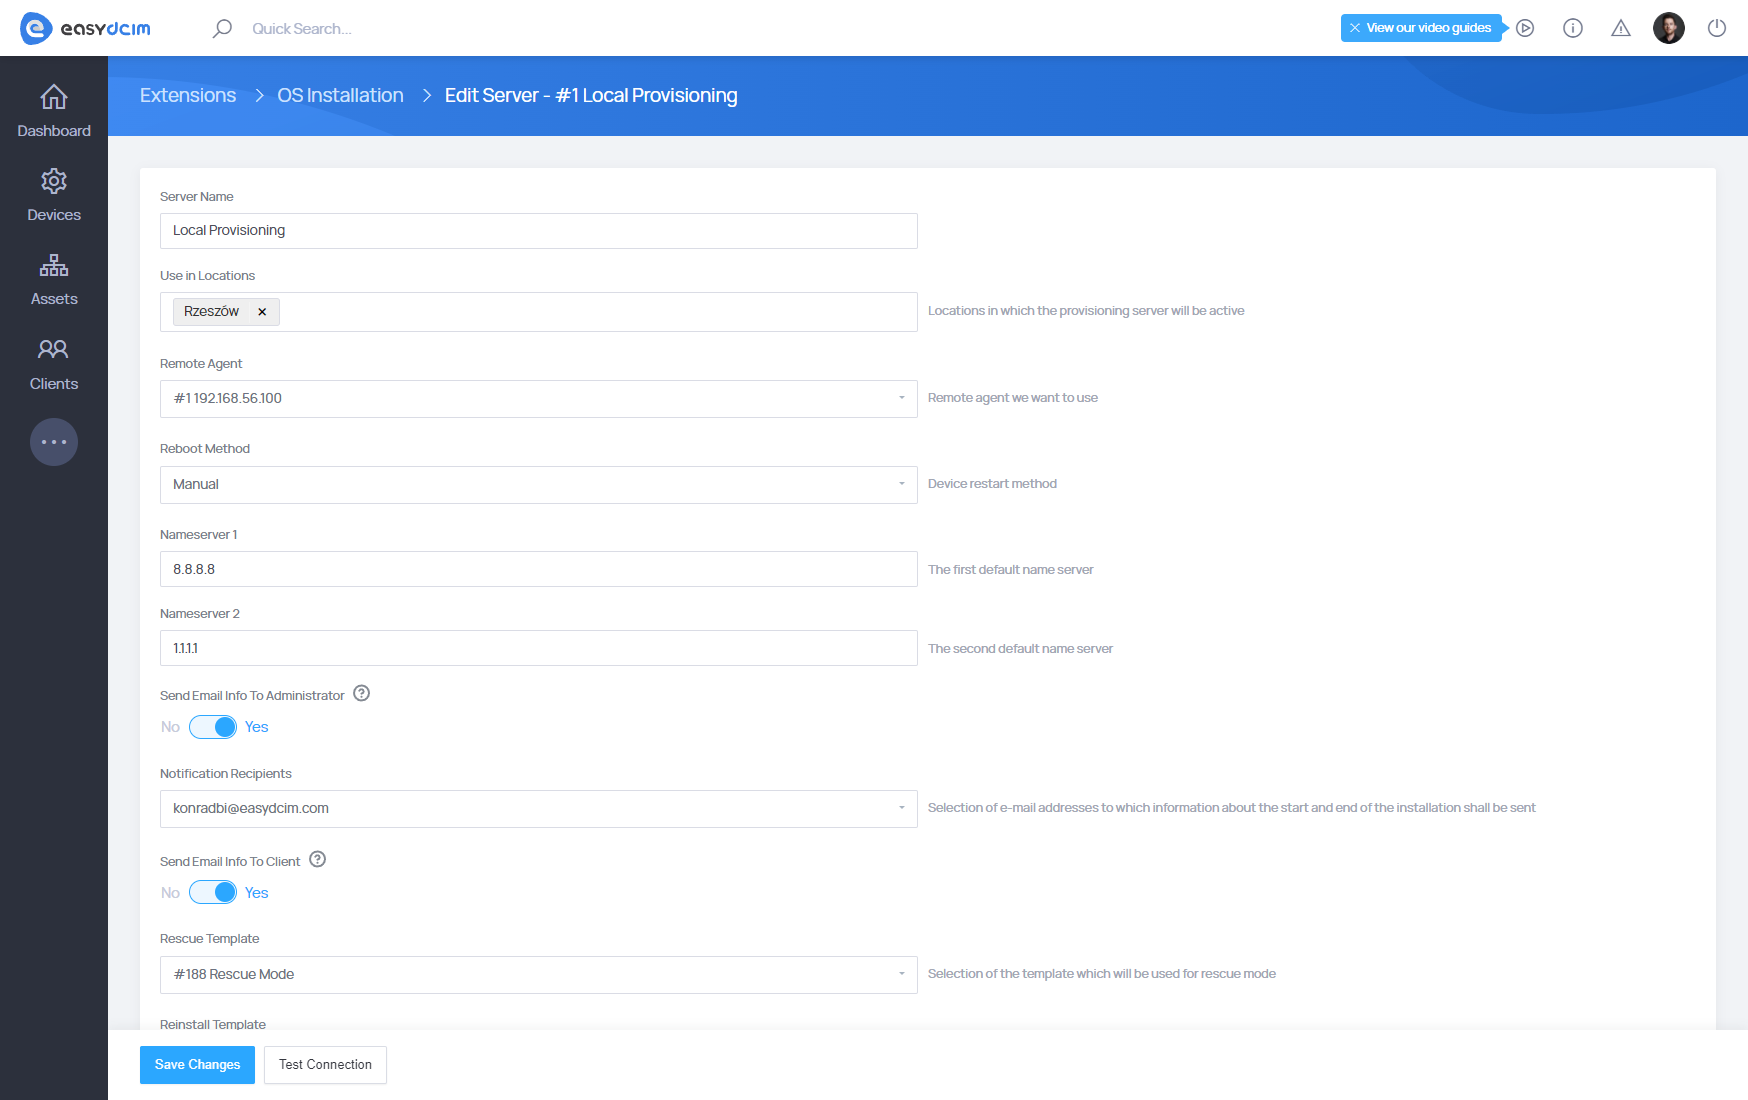
Once the server is created, locate it in the list and use the Edit option from the Actions column to configure additional settings related to provisioning, networking, and automation. These module settings are applied during every operating system installation for this server.
-
Remote Agent – the remote agent responsible for handling PXE, DHCP, TFTP, and installation tasks
-
Reboot Method – defines how the server is restarted before provisioning
- Manual – manual restart performed by an administrator
- IPMI – restart via IPMI with automatic PXE boot
- IPMI (no PXE) – restart via IPMI without forcing PXE mode
- PDU – power cycle of the assigned PDU outlet (APC or Raritan)
- Send Email Info to Administrator – sends notifications about installation start and completion to the selected administrator
- Notification Recipients – list of email addresses that will receive installation status notifications
- Send Email Info to Client – sends installation start and completion notifications to the server owner
- Reinstall Template – template automatically used during reinstallation (e.g. service termination)
- Nameserver 1 – primary DNS server assigned during installation
- Nameserver 2 – secondary DNS server assigned during installation
- Bootloader – default boot file used during PXE boot
Provisioning Statistics
The Provisioning Statistics view provides detailed statistics for each provisioning server, allowing administrators to quickly assess reliability, usage, and current activity.
For each server, the following statistics are displayed:
-
Provisioning Results – A visual summary showing the ratio of successful and cancelled provisioning tasks, along with the total number of attempts. This helps quickly identify unstable or problematic provisioning servers.
-
Success Rate – Displays the percentage of successful provisioning tasks calculated from all attempts. Color indicators make it easy to distinguish healthy servers from those with frequent failures.
-
Provisioning Templates – Shows the number of Linux and Windows templates assigned to the server. Each value is clickable and opens a filtered list of templates assigned to that server and operating system family.
-
Last Provisioning – Shows when the last provisioning task was executed on the server, displayed in a human-readable format. This helps determine whether the server is actively used or idle.
Remote Provisioning Submodule
The Remote Provisioning submodule enables fully automated operating system installation and configuration on dedicated servers.
It works in conjunction with Remote Agents, which are required to handle provisioning tasks locally within each data center. Without at least one configured Remote Agent, the submodule cannot operate.
Remote Agents are managed centrally from the EasyDCIM control panel. Learn how to configure them here: Remote Agents
How It Works (Example)
EasyDCIM acts as a central master system, while each data center runs its own Remote Agent.
Example setup:
- London data center:
10.10.10.0/24 - New York data center:
192.168.56.0/24
Each location requires its own DHCP and TFTP services, provided directly by the Remote Agent (built-in DHCP, TFTP, and Samba). Remote Agents communicate with EasyDCIM over port 8080 and periodically check for assigned tasks.
When EasyDCIM issues a task such as:
Install operating system X on server Y in London
Only the Remote Agent in the London data center receives and executes it. Agents in other locations remain idle.
This architecture ensures:
- centralized control,
- independent operation per data center,
- scalable and reliable OS provisioning across multiple locations.
Requirements
- Remote Agent has to be launched on a server that has a direct access to the Internet. It is required so as to automatically download the necessary operating system installation files during the process of dedicated server provisioning. Proxy servers are not supported.
- No other DHCP servers can be active in the VLAN network of the remote agent server.
- Dedicated servers on which you want to install the operating system have to be located in the same VLAN network as remote agent server.
- Dedicated servers have to support the Preboot Execution Environment feature (PXE).
- The device in EasyDCIM requires a correctly set ‘MAC Address’ field in order to identify the device in the network.
Operating Principle
The provisioning process is based on PXE boot, using DHCP and TFTP services provided by the Remote Agent.
Even in environments with static IP addressing, a DHCP server is required to:
- assign the IP address during PXE boot,
- indicate which bootloader to use,
- define where the bootloader should be downloaded from.
The TFTP server stores and serves all required network bootloader files.
Provisioning Workflow
During operating system installation, EasyDCIM and the Remote Agent perform the following steps:
-
Task creation EasyDCIM creates a provisioning task for a specific device.
-
DHCP configuration The Remote Agent generates a temporary DHCP configuration based on the device’s MAC address and network settings.
-
Server reboot The server is rebooted into PXE mode using IPMI, PDU, or manual restart.
-
PXE boot The server requests an IP address and boot instructions from the DHCP server.
-
Bootloader delivery The Remote Agent delivers the appropriate bootloader via TFTP.
-
Installation configuration The server requests an installation profile (Kickstart, Preseed, Autoinstall, etc.) generated by EasyDCIM.
-
Automated installation The Remote Agent installs the operating system, including:
- disk partitioning,
- network configuration,
- user and credential setup,
- package installation,
- post-installation scripts.
-
Completion report Once finished, the Remote Agent reports the installation status back to EasyDCIM.
Most installation templates follow this exact flow; only template-specific details may differ.
DHCP Server Operation
The DHCP server is installed automatically with each Remote Agent.
-
Configuration file:
/opt/easydcim_remote/system/etc/dhcpd.conf -
The configuration is fully generated automatically whenever:
- a subnet is added or modified,
- module settings are saved,
- a provisioning task starts or ends,
- a provisioning task is removed from the queue.
Manual changes are not recommended, as the file is regenerated automatically and all changes will be overwritten.
TFTP Server Operation
The TFTP server is also installed automatically with the Remote Agent.
- Configuration file:
/etc/default/tftpd-hpa - Boot files directory:
/opt/easydcim_remote/system/tftpboot
This directory contains all required bootloaders used during PXE installation. No additional configuration is required.
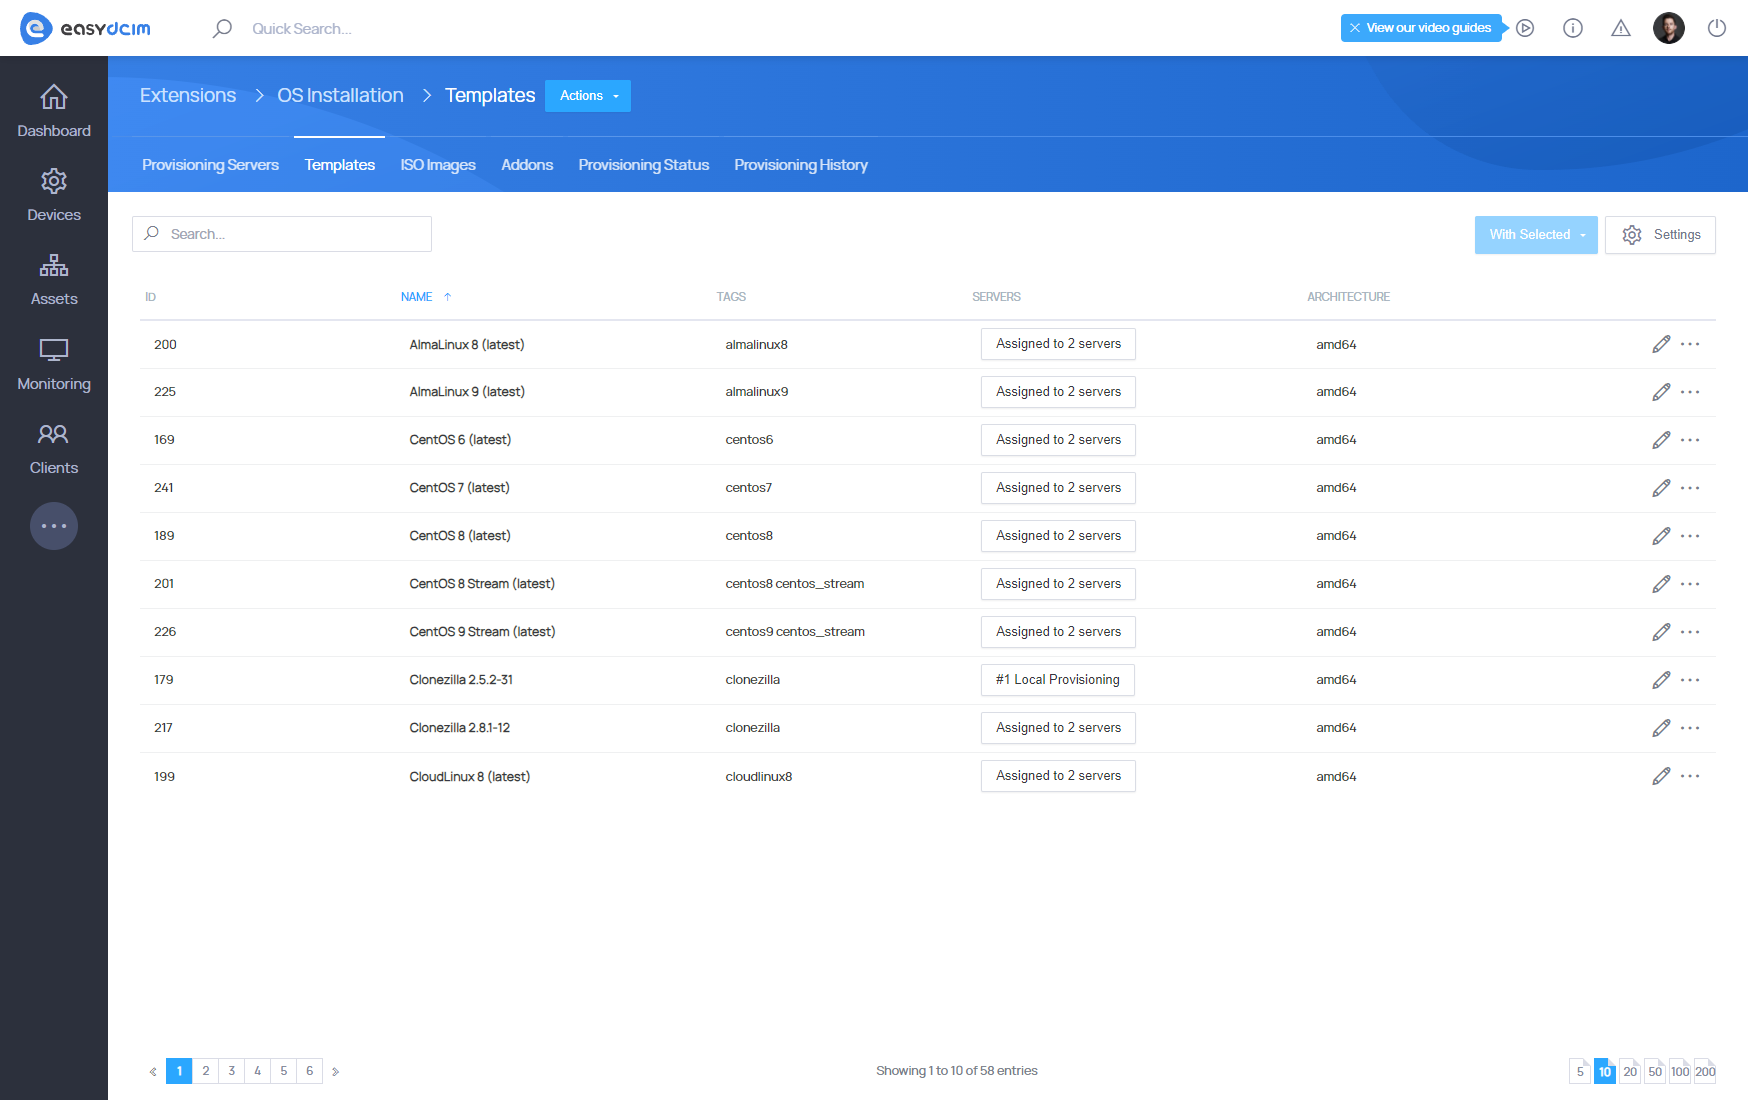
Provisioning Templates
Provisioning Templates define how an operating system or utility is installed on a server. They control the entire provisioning logic, including boot method, disk layout, package selection, and post-installation actions.
EasyDCIM supports templates for:
- Operating systems (Linux, Windows, Unix),
- Rescue and utility environments,
- Maintenance tasks (e.g. disk wipe, diagnostics).
Templates are centrally managed and synchronized with the license server to ensure consistency and up-to-date installation logic.
Template Synchronization
Official templates are provided and maintained by EasyDCIM. They should be synchronized using the Templates Synchronization action available in the interface. Official templates should not be modified directly.
Synchronization:
- updates template logic and configuration,
- ensures compatibility with the latest provisioning profiles,
- keeps installation methods aligned with supported systems.
Template synchronization settings are available in: Extensions → OS Installation → Configuration
In this section you can:
- define the automatic synchronization interval (or disable it),
- manually trigger synchronization using Sync Provisioning Templates Now,
- control how often EasyDCIM checks the license server for template updates.
Automatic synchronization runs in the background based on the selected interval, while manual synchronization allows you to immediately apply the latest official template changes when needed.
Adding Windows Family Templates
Windows templates are not included by default and must be created manually. Each Windows template is generated directly from a Windows ISO image. For best compatibility and stability, we strongly recommend using official Microsoft ISO files.
Important: A Windows template can be assigned to only one provisioning server.
How to add a Windows template
- Open the OS Installation extension.
- Go to the Templates section.
- From the top action menu, select Add Windows.
- Choose the provisioning server where the template should be created.
- Upload or place the Windows ISO file on the selected provisioning server in the following directory: /opt/easydcim_remote/system/iso
- Follow the on-screen instructions to start the template generation process.
The entire operation is executed via SSH on the remote agent and handled automatically by EasyDCIM through the command line.
Adding Custom VMware ESXi Templates
EasyDCIM natively supports VMware ESXi 7.0b and VMware ESXi 8.0, however in some environments it may be necessary to use a custom or vendor-specific ESXi ISO image.
Custom ESXi ISO images are often required due to:
- hardware vendor customizations (for example Dell or HPE),
- non-standard or additional drivers,
- custom firmware extensions or VIB packages.
Important:
- This provisioning method supports UEFI boot mode only.
- A VMware ESXi template must be added separately for each provisioning server.
How to add a Custom VMware ESXi template:
- Open the OS Installation extension.
- Go to the Templates section.
- From the top action menu, select Add VMware ESXi.
- Choose the provisioning server where the template should be created.
- Upload or place the ESXi ISO file on the selected provisioning server in the following directory: /opt/easydcim_remote/system/iso
- Follow the on-screen instructions to start the template generation process.
The entire operation is executed via SSH on the remote agent and handled automatically by EasyDCIM through the command line.
Official vs Custom Templates
| Feature / Behavior | Official Templates | Custom Templates |
|---|---|---|
| Source | Provided by EasyDCIM | Created by administrator |
| Maintenance | Maintained by EasyDCIM | Maintained by customer |
| License Server Synchronization | Yes (automatic or manual) | Yes (manual) |
| Editable | Yes (partially editable) | Yes (fully editable) |
| Upgrade Safety | Always safe to update | Safe – remains unchanged during sync |
| Intended Usage | Base templates for installations | Environment- or customer-specific customization |
| Recommended for Direct Changes | No | Yes |
Always create a custom template as a copy of an official template. This ensures full control over customization while keeping official templates safe and up to date.
Provisioning Addons
During operating system installation, EasyDCIM uses provisioning addons as a flexible mechanism to extend and modify the provisioning behavior without changing the base OS template.
Provisioning addons allow injecting additional logic such as disk partitioning, first boot configuration, or post-install scripts in a structured and predictable way.
Provisioning Addon Sources
Provisioning addons can originate from two sources:
- Provisioning addons assigned to the OS template
- Provisioning addons selected by the user during installation configuration
Both sources are combined during the provisioning process according to defined priority rules.
Provisioning Addon Types
Provisioning addons are distinguished by the type field:
disklayout– defines disk partitioningfirstboot– script executed during the first system bootpostinstall– script executed after OS installation completes
Provisioning Addon Processing Rules
Disk Layout
- By default, the disk layout provisioning addon assigned to the OS template is used.
- If no disk layout provisioning addon is assigned to the template, the disk layout defined directly in the OS template is applied.
- A disk layout provisioning addon selected by the user overrides all other partitioning configurations.
First Boot / Post Install
- The code defined in the OS template acts as the base configuration.
- Provisioning addons assigned to the template are appended to the base code.
- Provisioning addons selected by the user (extras) are appended last.
The provisioning addon code is concatenated rather than replaced.
Priority and Execution Order
- Disk layout:
user selection → template default - First boot / post install:
template base → template provisioning addons → user provisioning addons
Final Result
Based on the selected OS template and applied provisioning addons, EasyDCIM builds a complete provisioning configuration. This configuration is passed to the provisioning engine and used during the actual operating system installation process.
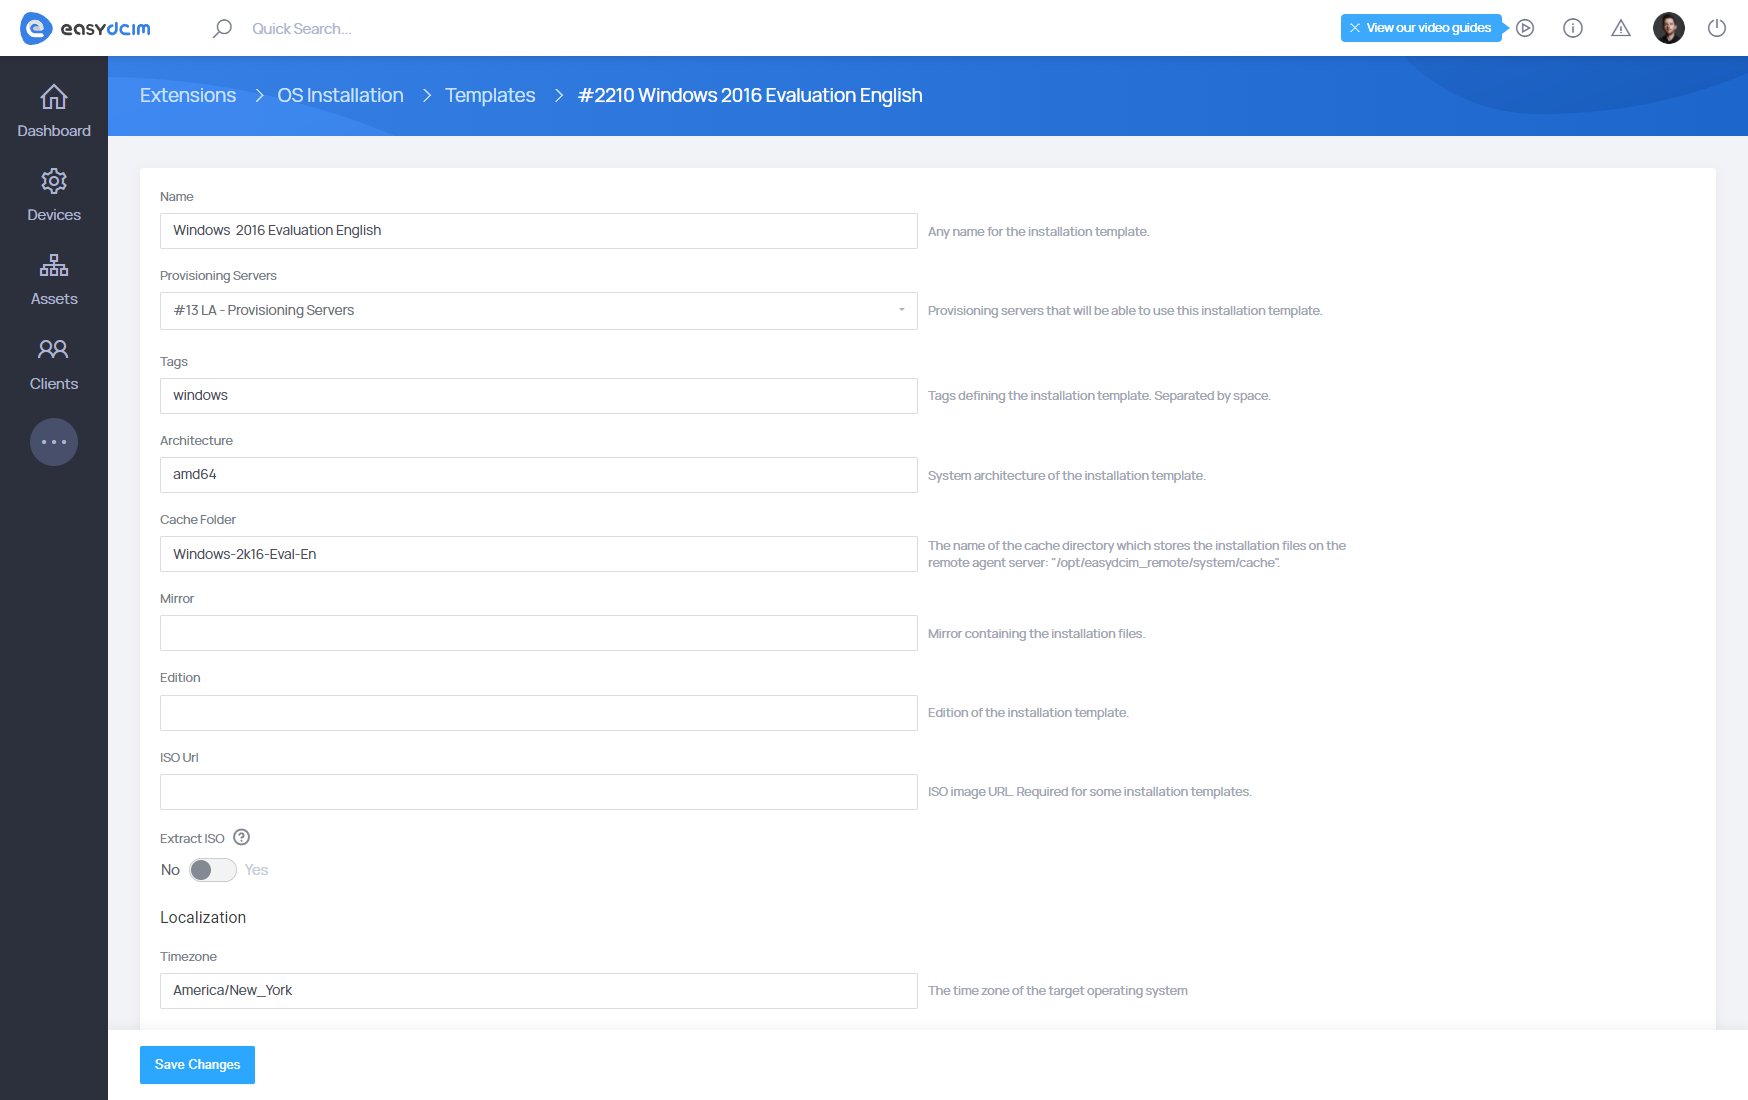
Template Customization
When working with a custom template, you can safely adjust installation behavior without affecting the official base.
These fields define the core installation mechanism and should remain unchanged:
- Architecture
- Edition
- GPXE Script
Modifying them may break PXE boot or OS installation.
The following fields are designed to be safely customized:
- Mirror - Defines the repository mirror used to download installation files (e.g. a geographically closer mirror).
- Disk Layout - Controls disk partitioning and filesystem layout. The script depends on the operating system and distribution.
- Packages - A list of additional system packages to be installed (one package per line).
- Post-Installation Script - Custom script executed after the OS installation finishes (e.g. custom configuration).
- Timezone - Sets the system timezone during installation.
- Language - Defines the system language used by the installed operating system.

Recommended Workflow
- Synchronize official templates from the license server.
- Create a copy of the selected official template.
- Customize only supported fields.
- Assign the custom template to servers or provisioning profiles.
- Keep official templates synchronized for future updates.
This approach ensures:
- safe upgrades,
- predictable behavior,
- clear separation between vendor logic and customer customization.
Templates Cache
When you use the template for the first time during the server provisioning process, the required system installation files are downloaded. In order not to download them during each new installation, they will be stored in appropriate catalogs. Each template has its own folder into which the installation files are downloaded. These directories are located in the following path: /opt/easydcim_remote/system/cache. The cache directory of the template can be freely cleaned using the ‘Clear Cache’ mechanism.
Provisioning Profiles
Provisioning Profiles define how the installation process behaves at specific stages of operating system deployment. They act as reusable building blocks that extend and customize templates without modifying the core installation logic.
Profiles can be attached to templates and are automatically executed during provisioning, depending on their type. Typical use cases include:
- automated disk partitioning logic,
- OS-specific installation configuration (Kickstart, Preseed, Autoinstall, Unattend),
- Windows boot and initialization scripts,
- first-boot and post-installation automation (hardening, agents, monitoring).
Provisioning Profiles are synchronized from the license server and can be updated independently of templates. Official profiles are maintained by EasyDCIM, while custom profiles allow administrators to fully tailor the provisioning process to their environment.
Using profiles ensures consistency, reusability, and easier maintenance across multiple templates and installations.
Provisioning Profiles Overview
| Profile Name | Purpose | Short Description |
|---|---|---|
| Universal RHEL First Boot | First boot configuration | Runs on first system boot. Installs SSH keys, detects the primary NIC by MAC address, configures additional IP addresses using NetworkManager, and performs run-once cleanup. |
| Universal RHEL Kickstart | RHEL-based OS installation | Universal Kickstart for AlmaLinux, Rocky Linux, CentOS Stream. Autodetects repository layout, configures static networking, installs the system, and fetches firstboot and post-installation profiles. |
| Fedora Server Kickstart | Fedora Server installation | Kickstart profile for Fedora Server using Fedora repository layout. Handles static networking, package installation, and firstboot provisioning. |
| Oracle Linux Kickstart | Oracle Linux installation | Kickstart profile for Oracle Linux distributions. Configures static networking, disk layout, package selection, and firstboot execution. |
| VzLinux Kickstart | VzLinux installation | Kickstart profile compatible with VzLinux. Performs standard automated installation with static network configuration and firstboot provisioning. |
| CentOS 6 / 7 Legacy Kickstart | Legacy CentOS installation | Legacy Kickstart for CentOS 6 and 7. Uses rc.local for first boot provisioning and legacy network configuration methods. |
| SystemRescueCD Network & DNS Setup | Rescue environment configuration | Custom provisioning script for SystemRescueCD. Reconfigures DNS and networking for all active interfaces using NetworkManager. |
| VMware ESXi Automated Install | ESXi installation & provisioning | Automates ESXi installation, enables SSH, configures datastore logging, installs SSH keys, runs firstboot logic, and persists configuration. |
| Universal Debian Preseed | Debian installation | Universal Debian preseed profile with static networking, automated storage, user creation, and late-command provisioning hooks. |
| Debian Post-Installation | Debian post-install tasks | Post-installation script for Debian systems. Configures APT sources, hostname, DNS settings, and executes custom provisioning logic. |
| Debian First Boot | Debian first boot provisioning | First boot script for Debian. Installs SSH keys, detects NIC by MAC, applies additional IP addresses, restarts networking, and performs cleanup. |
| Ubuntu Autoinstall (cloud-init) | Ubuntu Server installation | Cloud-init based autoinstall profile. Handles networking, storage, SSH access, package installation, webhook reporting, and late provisioning steps. |
| Ubuntu First Boot Cleanup | Ubuntu firstboot cleanup | One-time cleanup script that disables and removes firstboot systemd services after successful execution. |
| Ubuntu Post-Installation | Ubuntu post-install setup | Downloads the firstboot script, creates and enables a systemd firstboot service, and runs custom post-install logic. |
| Ubuntu 20 Kickstart | Ubuntu 20.x legacy install | Kickstart-based installer for Ubuntu 20.x. Configures static networking, netplan, disk layout, and firstboot execution. |
| Ubuntu 20 First Boot | Ubuntu 20.x SSH provisioning | First boot script for Ubuntu 20.x that installs SSH authorized keys and applies correct permissions. |
| FreeBSD 13 Automated Install | FreeBSD installation | Automates FreeBSD 13 installation with ZFS, static networking, user creation, SSH enablement, and first boot execution via rc.local. |
| Windows WinPE StartNet | Windows WinPE bootstrap | WinPE StartNet script. Initializes networking, loads drivers, maps SMB shares, downloads unattend.xml, and launches Windows setup. |
| Windows Unattended Setup | Windows automated installation | Unattended XML profile defining disk layout, language, networking, first-logon commands, post-install scripts, and OOBE configuration. |
| Windows Post-Installation (RDP) | Windows post-install configuration | PowerShell script executed after installation. Enables RDP access and configures firewall rules. |
Provisioning Variables Reference
EasyDCIM exposes a rich set of variables that can be used inside gPXE scripts, kickstart / preseed / autoinstall files, first-boot scripts, and post-installation profiles.
All templates are rendered using the Twig templating engine, which allows you to use variables, conditions, loops, filters, and nested structures.
During the provisioning process:
- All variables are automatically resolved and replaced with device-specific values
- The full list of available variable keys used for a given installation is logged for auditing and debugging purposes
- Variable logging happens on every provisioning run, before template rendering
For each installation, EasyDCIM logs the complete list of resolved variable keys (without exposing sensitive values) to the following file on the Remote Agent:
/opt/easydcim_remote/storage/logs/os-installation-YYYY-MM-DD.log
This log allows administrators to:
- Verify which variables were available during provisioning
- Debug custom templates and scripts
- Safely inspect template context without exposing credentials
Core Device & Network Variables
| Variable | Description | Example |
|---|---|---|
| {{ mac }} | MAC address of the provisioned device | 00:50:56:21:39:fd |
| {{ ip }} | Primary IP address | 192.168.203.200 |
| {{ netmask }} | Network netmask | 255.255.255.0 |
| {{ gateway }} | Default gateway | 192.168.203.1 |
| {{ nameserver }} | Primary DNS server | 1.1.1.1 |
| {{ nameserver2 }} | Secondary DNS server | 8.8.8.8 |
| {{ nameservers }} | Comma-separated DNS servers | 1.1.1.1,8.8.8.8 |
| {{ hostname }} | Hostname assigned to the system | provision.client |
PXE & Template Variables
| Variable | Description | Example |
|---|---|---|
| {{ pxeserver }} | PXE server address (host:port) | 192.168.203.128:8080 |
| {{ pxeip }} | PXE server IP | 192.168.203.128 |
| {{ templateid }} | Numeric template ID | 105 |
| {{ edition }} | OS edition (if defined) | null |
| {{ editionName }} | Human-readable OS name | AlmaLinux 10 (latest) |
| {{ mirror }} | Installation repository mirror | https://repo.almalinux.org/almalinux/10/ |
| {{ cachefolder }} | Local cache directory | almalinux10 |
| {{ isUefi }} | Only when Reboot Method is IPMI (UEFI Mode) | true / false |
Localization & System Settings
| Variable | Description | Example |
|---|---|---|
| {{ timezone }} | System timezone | Europe/Warsaw |
| {{ lang }} | System language | en_US |
User & Authentication Variables
| Variable | Description | Example |
|---|---|---|
| {{ username }} | Default user account | user |
| {{ adminusername }} | Admin username (fallback) | user |
| {{ userpassword }} | Plain user password | secret |
| {{ plainrootpassword }} | Plain root password | rootpass |
| {{ userpasswordmd5 }} | MD5-crypted user password | $1$… |
| {{ rootpasswordmd5 }} | MD5-crypted root password | $1$… |
| {{ rootpassword }} | Alias of encrypted root password | $1$… |
Disk & Package Variables
| Variable | Description |
|---|---|
| {{ disklayout }} | Full disk partitioning script |
| {{ packages }} | Raw package list (newline separated) |
| {{ packages_array }} | Package list as array |
SSH Keys
| Variable | Description |
|---|---|
| {{ provision.ssh_keys }} | Array of SSH public keys |
Additional IP Addresses
| Variable | Description | Example |
|---|---|---|
| {{ additional_ips }} | Array of additional IPs | 192.168.203.201, 192.168.203.202 |
Provisioning Script Variables
These values originate from provisioning profiles and user input:
| Variable | Description |
|---|---|
| {{ first_boot }} | First-boot script |
| {{ post_installation }} | Post-installation script |
| {{ provision.disk_layout }} | Disk layout from profile |
| {{ provision.packages }} | Packages from profile |
| {{ provision.hostname }} | Requested hostname |
| {{ provision.username }} | Requested username |
| {{ provision.password }} | Requested password |
Windows-Specific Variables
| Variable | Description | Example |
|---|---|---|
| {{ sambashare }} | Samba server IP | 192.168.203.128 |
| {{ sambapassword }} | Samba password | MWroUD8pF0wz |
| {{ computerName }} | Windows-safe hostname (max 15 chars) | provisionclient |
Metadata Variables
Metadata is sourced directly from the device record and can be used in scripts:
| Example Macros |
|---|
| {{ device.metadata[‘IP Address’] }} |
| {{ device.metadata[‘MAC Address’] }} |
| {{ device.metadata[‘Hostname’] }} |
| {{ device.metadata[‘RAM Size’] }} |
| {{ device.metadata[‘CPU Cores’] }} |
| {{ device.metadata[‘OS’] }} |
| {{ device.metadata[‘IPMI IP Address’] }} |
| {{ device.metadata[‘Firmware’] }} |
| {{ device.metadata[‘Redfish Support’] }} |
RAID Partitioning
Automated RAID configuration is a complex process and strictly depends on the hardware setup of a given server. We strongly recommend performing thorough testing in a staging environment before deploying to production.
Developing reliable partitioning scripts is a meticulous and time-intensive process. It usually requires hands-on work, involving repeated operating system installations to refine and validate the setup. While this iterative approach can be tedious, it is also the most dependable way to ensure the partitioning scheme is correctly aligned with specific hardware and deployment requirements.
For reference, example scripts that have been tested and successfully used by our clients are available on our official Repository.
General Requirements:
- UEFI Mode: All examples provided assume the system firmware is configured to boot in UEFI mode. We recommend always using UEFI for RAID partitioning.
- Two physical disks: Either
/dev/sdaand/dev/sdb(SATA) or/dev/nvme0n1and/dev/nvme1n1(NVMe). - RAID 1 (Mirroring): Used for both the
/bootpartition and LVM volumes.
Red Hat-based Systems
SATA Disks:
- Uses Kickstart syntax.
- EFI partitions defined per disk.
- RAID 1 defined via
raiddirectives. - Example Script: RAID 1 SATA
NVMe Disks:
- Uses
nvme0n1andnvme1n1devices. - Structure is the same as with SATA, only device names differ.
- Example Script: RAID 1 NVMe
Debian
SATA Disks:
- Based on Debian Installer preseed.
- Similar to Ubuntu 20.04 structure but Debian-specific syntax.
- Example Script: RAID 1 SATA
NVMe Disks:
- Identical to SATA setup but with NVMe device names.
- Example Script: RAID 1 NVMe
Ubuntu 22.04 / 24.04
SATA Disks:
- Uses Autoinstall (cloud-init) YAML format.
- RAID 1 created for
/bootand LVM (root, swap). - EFI partitions are created on both disks.
- Example Script: RAID 1 SATA
NVMe Disks:
- Identical structure to SATA setup, using
/dev/nvme0n1and/dev/nvme1n1. - Example Script: RAID 1 NVMe
- Example Script: RAID 0 NVMe
ISO Images
ISO images are used to manually install the operating system. If you want to use an ISO image, you cannot perform an automatic OS installation within EasyDCIM. Available ISO images are accessible for end-users when a noVNC session is used. The images will be automatically mounted when creating a noVNC session in the “/home/easydcim/client_iso” directory. If the JAVA KVM applet allows mounting ISO images, then the end-user will be able to perform a manual installation of the operating system.
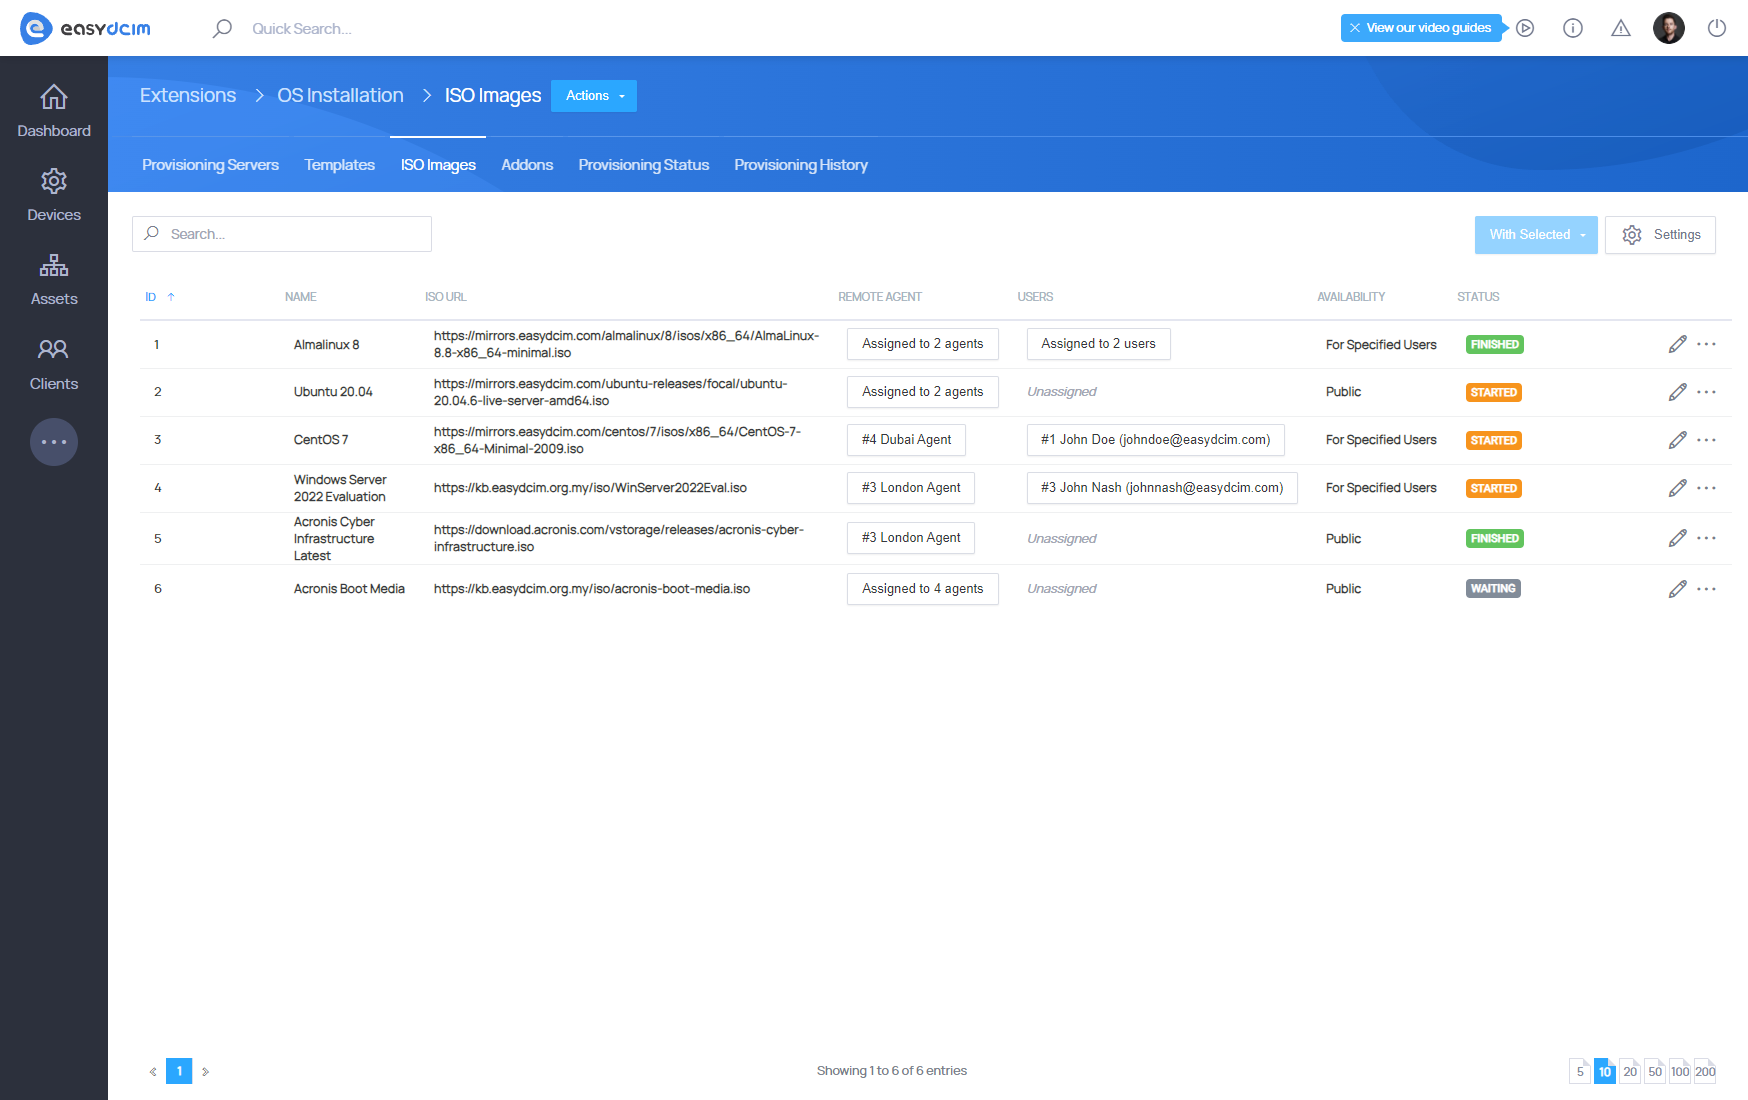
Adding new ISO Image
Select “Add ISO Image” from the action menu to add a new ISO image. The form includes the following fields:
- Name – an arbitrary name for the ISO image.
- Remote Agent – the Remote Agent(s) where the ISO image will be stored. Multiple agents can be selected.
- ISO URL – the direct URL to the ISO image.
- Availability – defines who can access the ISO image:
- Public – the image is available to all clients during any noVNC session.
- For Specified Users – the image is available only to selected clients during noVNC sessions.
After completing the form, the task of downloading the ISO image to the servers of the selected remote agents will be started. The download progress will be available in the table view. The download time depends on the network connection speed and network latency. ISO images are stored in the “/opt/easydcim_remot/sytem/isoimages” directory on the remote agent server.
Deleting ISO images
The existing ISO images can be easily deleted directly from the table view. When deleting an ISO image, a request to delete ISO files from remote agent servers is sent.
Additional ISO settings
To configure additional settings related to ISO images, move to the “Settings” section in the action menu. The form contains the following fields:
- Max ISO Images Per User - a maximum number of ISO images that can be assigned to a particular user
- Auto Remove ISO Images - time interval specifying the time after which the ISO images should be automatically deleted
- Auto Cancel Download Tasks - time interval that specifies after what time the excessive ISO download processes are to be automatically interrupted
Basic configuration
The OS installation extension needs minimal configuration, depending on the network environment in which it is launched. You can check the requirements for running the module on your network infrastructure in the appropriate section.
First, make sure the extension is working properly. This can be determined using the ′Remote Agent Configuration Verification′ widget that presents information about the status of individual services and configurations
Operating system installation
Each installation module is assigned to the appropriate location in the system. For example, if the installation module works for the ‘New York’ site, then all devices in the system that are assigned to the ‘New York’ site will be supported by this installation module.
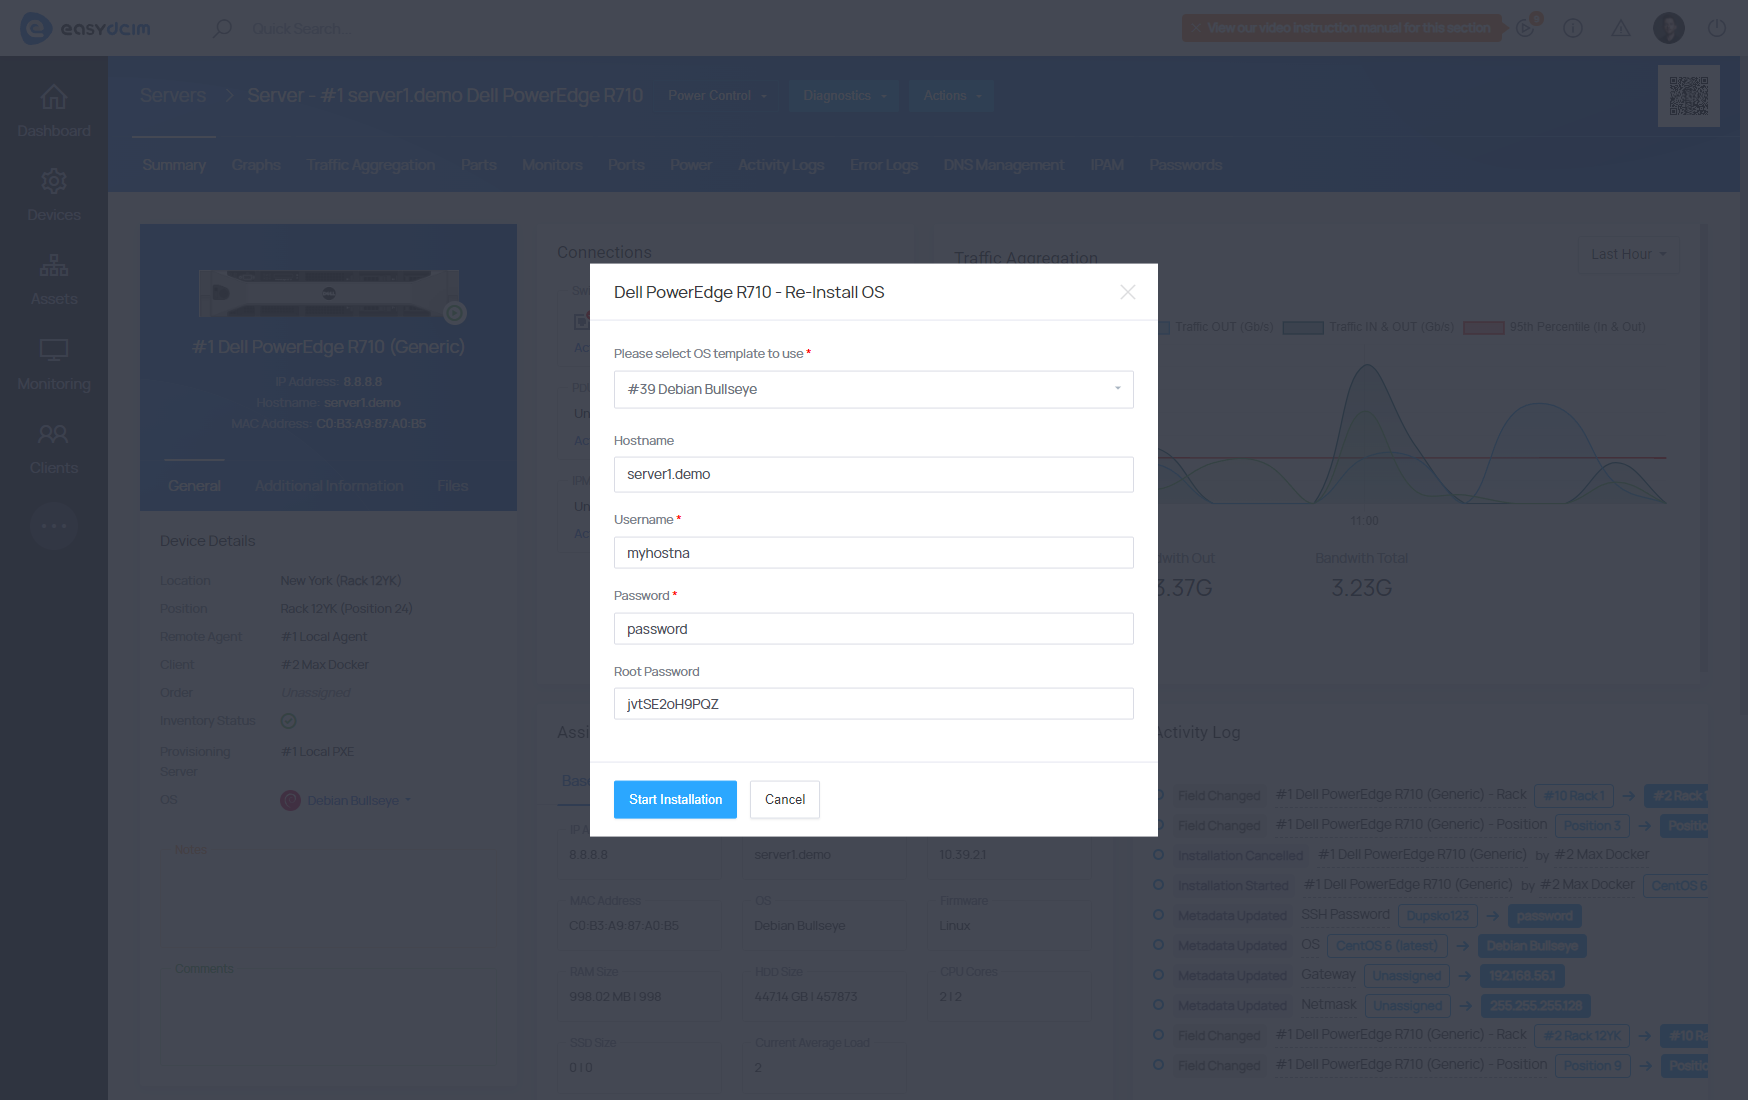
To start operating system installation, choose the ‘Re-Install OS’ option from the action menu. In the configuration fields specify the following:
- OS template - decide which OS instillation template to use (it can be an operating system or a diagnostic tool)
- Hostname - the hostname value is automatically downloaded from the device’s Hostname metadata and can be freely changed. This will be the hostname of the operating system that will be installed on the target server.
- Username - the username value is automatically downloaded from the SSH username of the device and can be freely changed. This will be the name of a standard user of the operating system that will be installed on the target server.
- Password - the password value is automatically downloaded from the device’s SSH Password metadata and can be freely changed. This will be the password of a standard user of the operating system that will be installed on the target server.
- Root Password - the root password value is automatically downloaded from the SSH Root Password of the device and can be freely changed. This will be the root password of the operating system that will be installed on the target server.
- The installation will start soon after clicking on the ′Save Changes′ button.
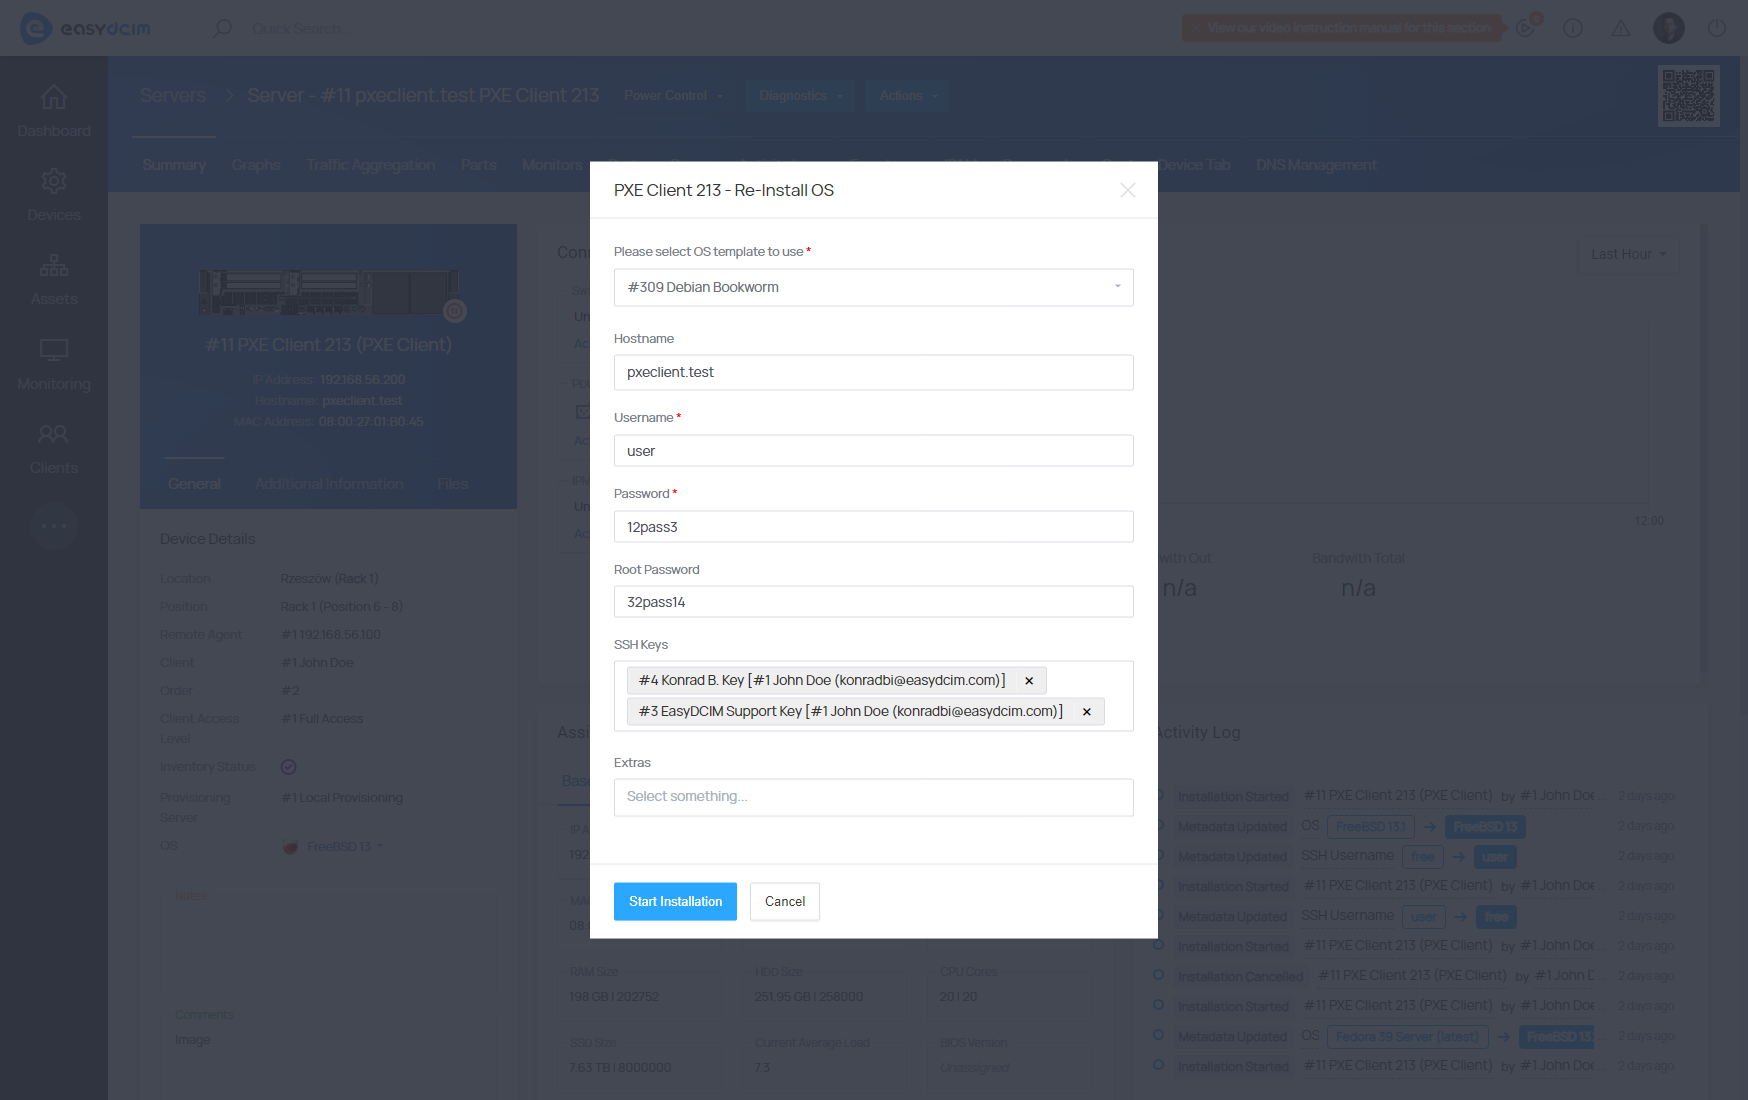
SSH Keys for OS Installation
During the operating system installation, you have the option to define SSH keys for the user account. It is important to note that these keys will be associated with a standard user account rather than the root account once the OS installation is finished.
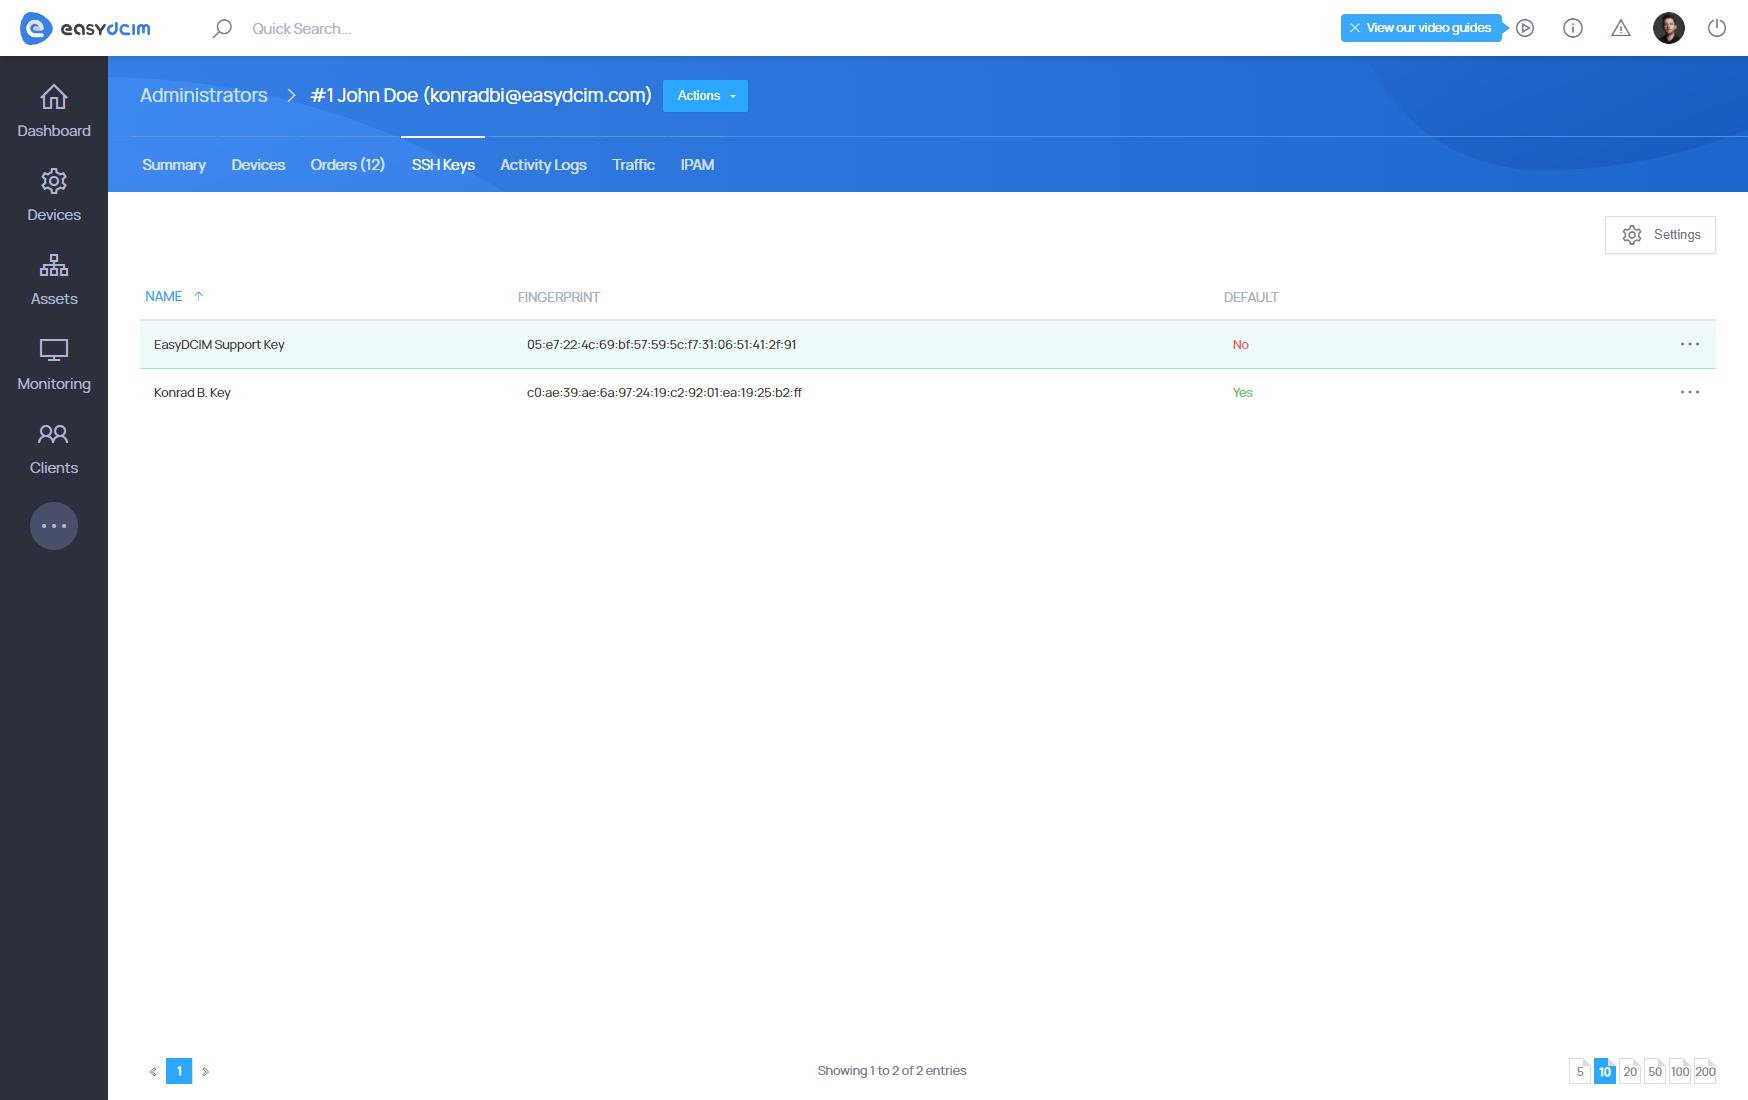
Each administrator and client can manage their public SSH keys. You can add keys in the administrator account summary view as well as in the client details section. To add a new SSH key, proceed to “Clients” → “Client Summary” and then select the “SSH Keys” tab.
The SSH2 public key in the OpenSSH format will start with “ssh-rsa”.
During the OS installation, you can select the previously added keys. Once the OS installation is complete, you can remotely log in to the dedicated server from SSH with a private key. SSH key support has been implemented for most Linux family systems. It is not available for rescue templates and Windows family systems.
Device configuration
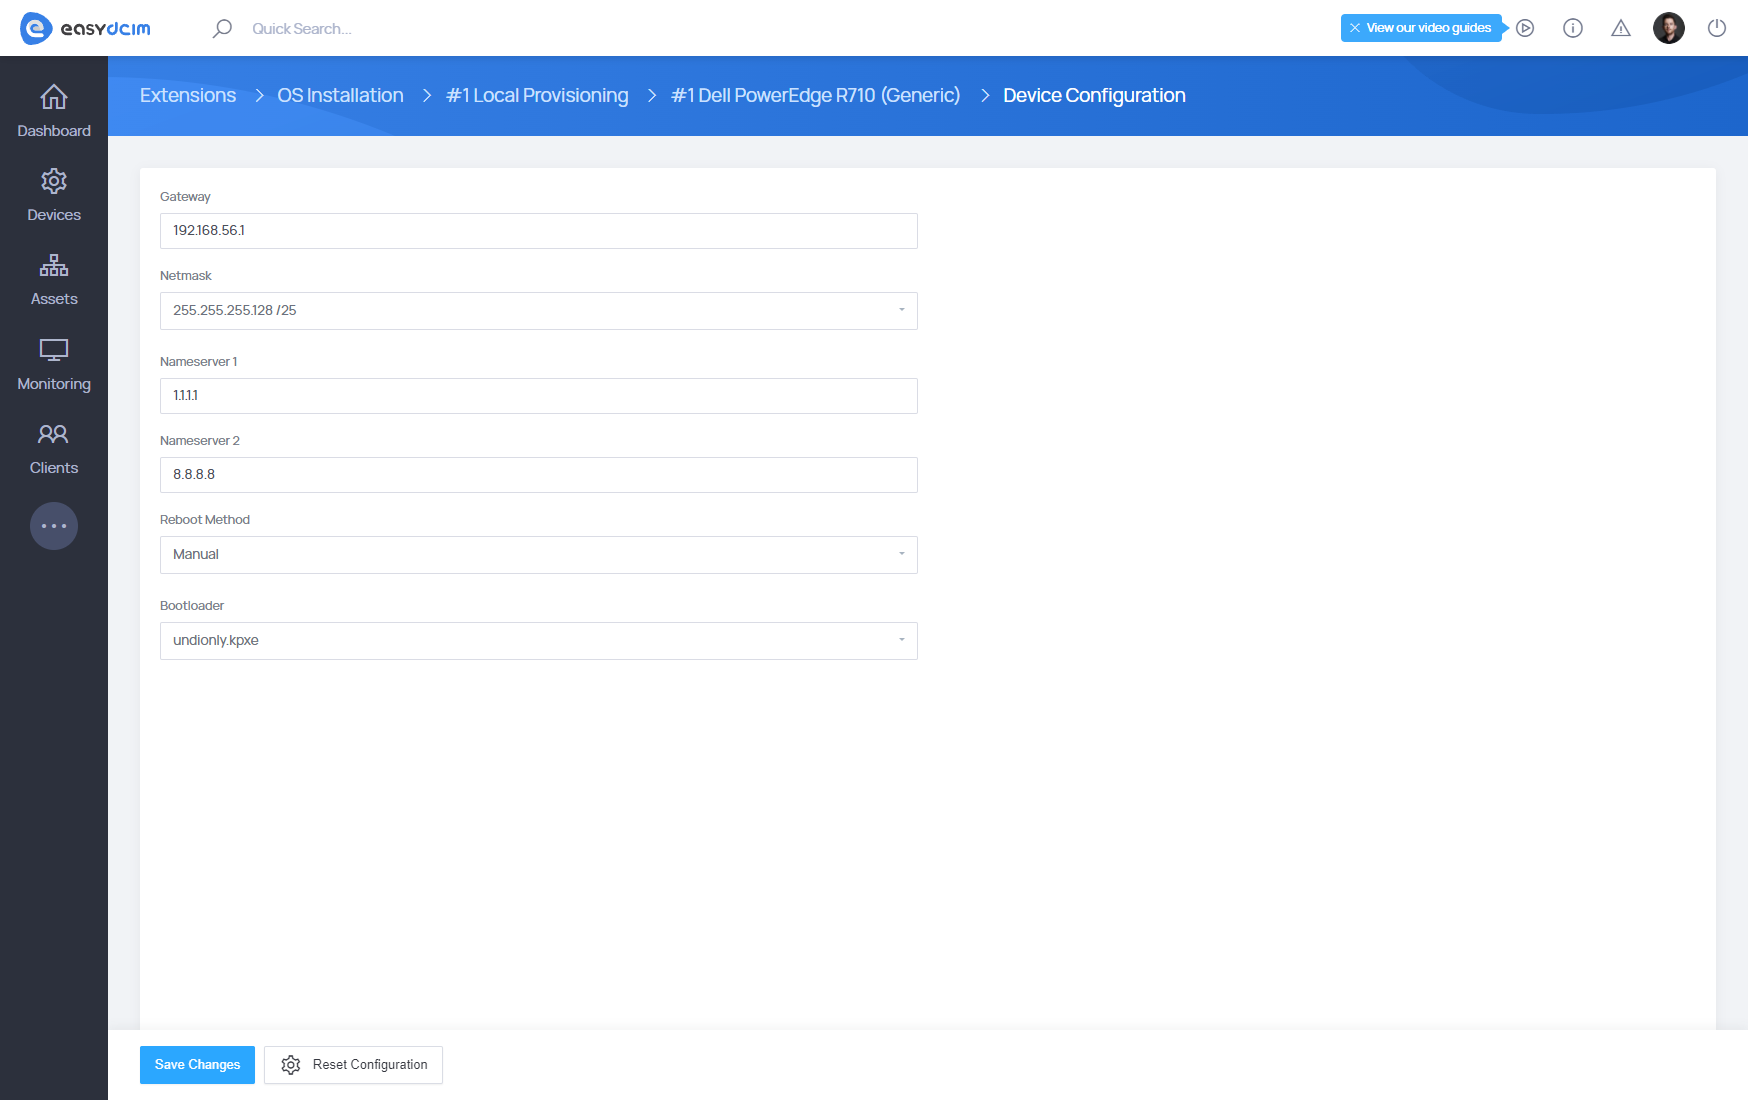
By default, each device uses the global settings of the installation module. However, you can easily adjust the configuration to a particular device.

To modify the configuration, navigate to the Configuration option in the action menu and enter the following details in the configuration fields:
- Gateway – The default gateway used for configuring network interfaces on the target server.
- Netmask – The subnet mask applied to network interface configurations on the target server.
- Nameserver 1 – The primary name server. If left blank, this value will be retrieved from the global settings of the installation module.
- Nameserver 2 – The secondary name server. If left blank, this value will also be retrieved from the global settings of the installation module.
- Reboot Method – The device restart method, automatically pulled from the global settings of the installation module by default.
- If your server is configured in UEFI mode, you must enforce IPMI (UEFI) booting in the Reboot Method field.
- Bootloader – The startup file, retrieved by default from the global settings of the installation module.
Network interfaces
The installer automatically configures network interfaces based on the following variables:
Basic configuration (for IPv4):
- Parent IP address - downloaded always from the metadata of IP Address of the given server
- Additional IP Addresses - downloaded always from the metadata of Additional IP
- Addresses of the given server
- Netmask - taken from device settings
- Gateway - taken from device settings
- Nameserver 1 - downloaded from device settings
- Nameserver 2 - downloaded from device settings
Configuration while the integration with the IP Address Management extension (for IPv4) is enabled:
- Parent IP address - downloaded always from the metadata of IP Address of the given server
- Additional IP addresses - downloaded always from the metadata of Additional IP Addresses of the given server
- Netmask - taken from the subnet settings in the IP Address Management extension. For example, if the metadata value of IP Address is 192.168.56.3, the system will automatically search for the subnet assigned to this device which contains the specified IP address in the IP Address Management extension. If such a subnet is found, the appropriate Netmask value will be set based on this subnet.
- Gateway - downloaded from the subnet settings in the IPAM module. For example, if the metadata value of IP Address is 192.168.56.3, the system will automatically search for the subnet assigned to this device which contains the specified IP address in the IP Address Management extension. If such a subnet is found, the appropriate Gateway value will be set based on this subnet.
- Nameserver 1 - downloaded from the subnet settings in the IP Address Management extension. For example, if the metadata value of IP Address is 192.168.56.3, the system will automatically search for the subnet assigned to this device which contains the specified IP address in the IP Address Management extension. If such a subnet is found, the appropriate Nameserver1 value will be set based on this subnet.
- Nameserver 2 - downloaded from the subnet settings in the IP Address Management extension. For example, if the metadata value of IP Address is 192.168.56.3, the system will automatically search for the subnet assigned to this device which contains the specified IP address in the IP Address Management extension. If such a subnet is found, the appropriate Nameserver 2 value will be set based on this subnet.
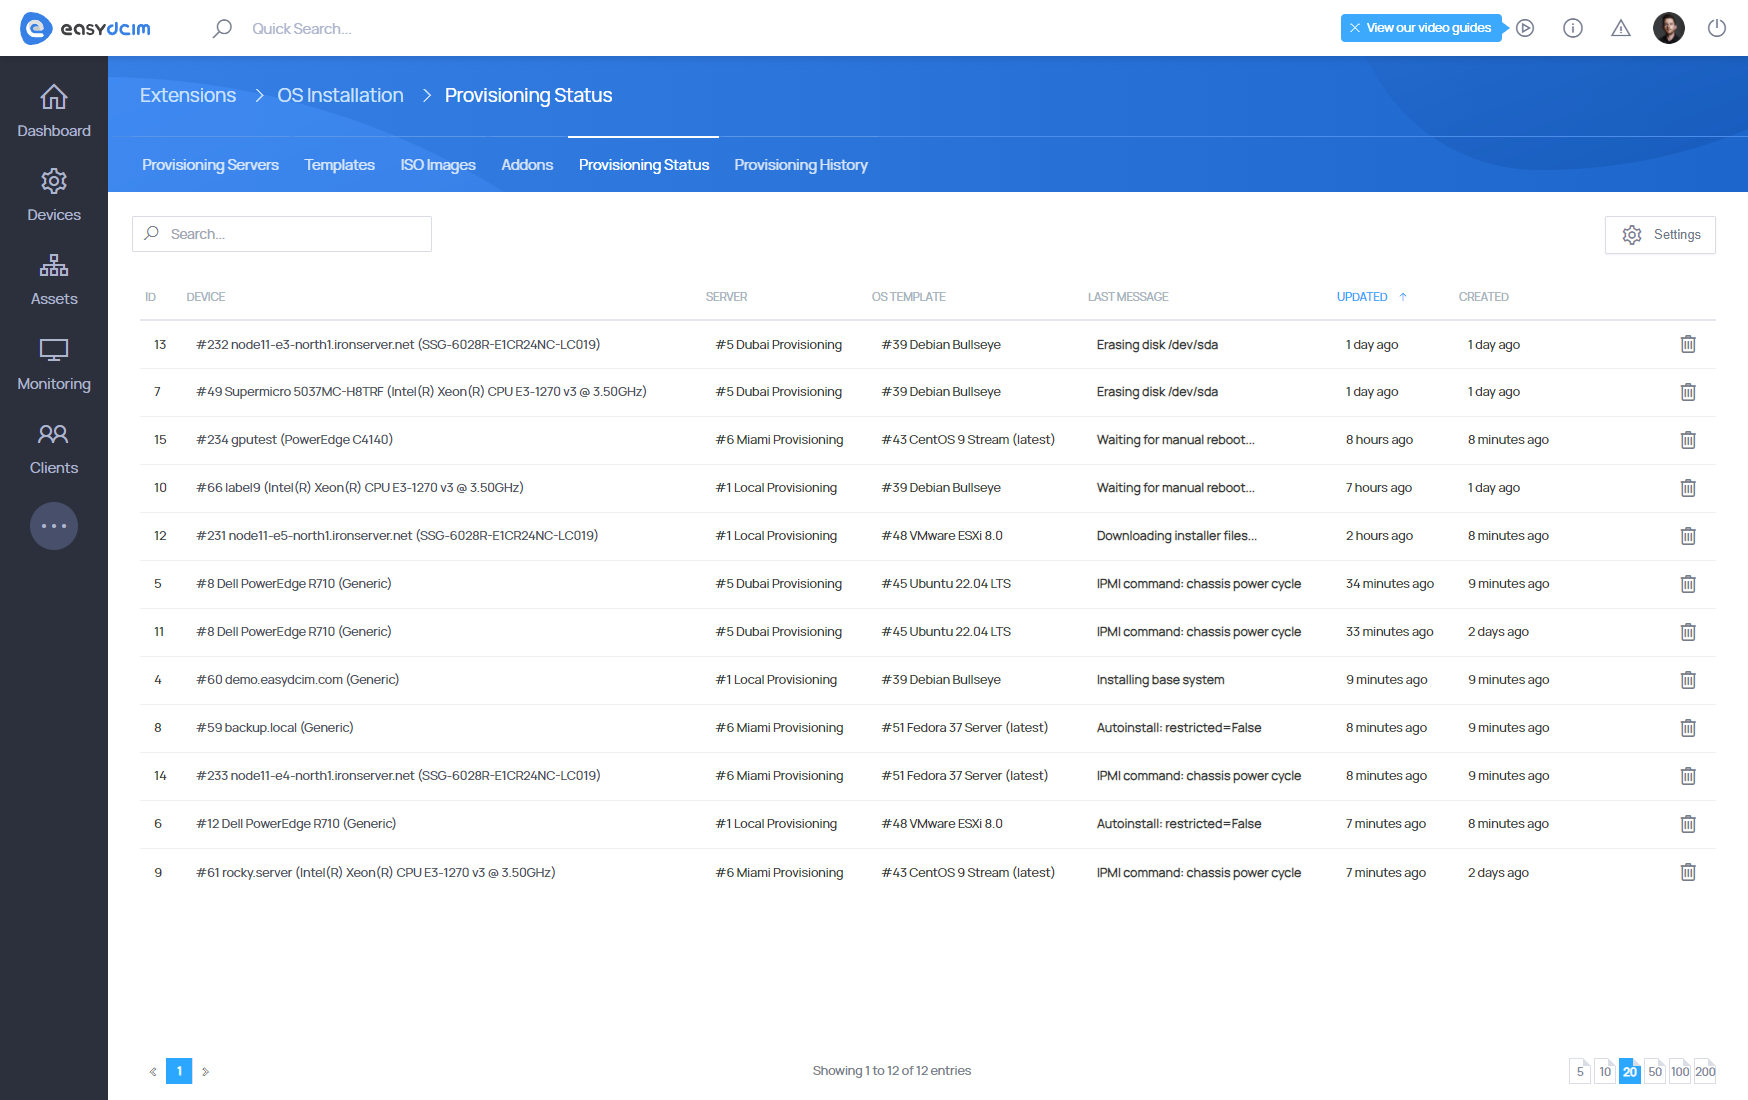
Provisioning Status
This section shows all currently running operating system installations.
For each active task, you can view:
- the target device,
- the selected installation template,
- the current provisioning state and progress.
Provisioning status is updated in real time by installer and agent scripts.
You may manually remove an active task at any time. Deleting a task while installation is in progress will immediately stop the process and it cannot be resumed.
Once an installation finishes (successfully or not), the task is automatically moved to Provisioning History.
Provisioning VLAN & Boot Confirmation
When IPAM Provisioning VLAN is enabled, the system automatically manages VLAN assignments during OS installation — including boot confirmation before restoring the original network configuration.
For a complete setup guide, automatic and manual flow description, and troubleshooting, see the dedicated article: Provisioning VLAN.
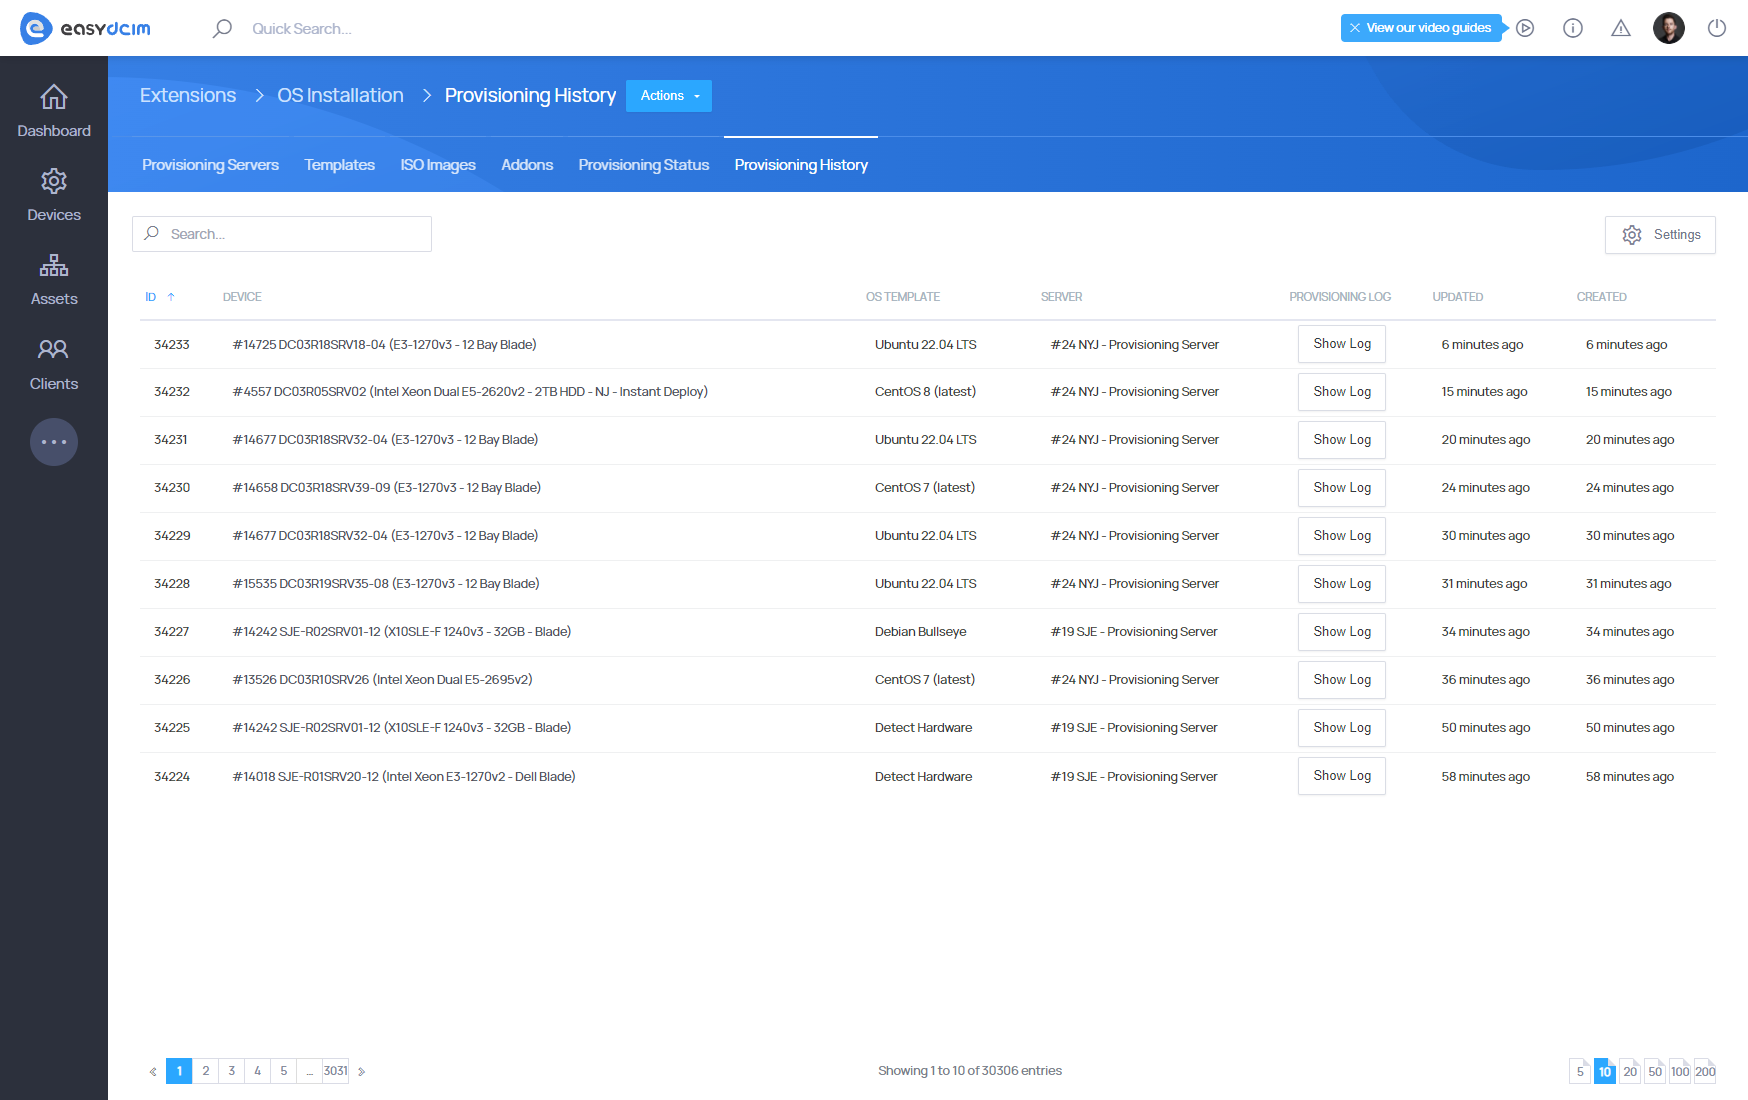
Provisioning History
This section contains a complete archive of finished provisioning tasks, including both successful and failed installations.
For each entry, you can:
- review execution details,
- inspect installation logs,
- troubleshoot issues using recorded output from the provisioning process.
Provisioning History provides full traceability of all past operating system installations.
Archived Templates
The Archived Templates section contains operating system templates that are no longer actively supported or available for provisioning. These templates are kept for historical reference, auditing, and troubleshooting purposes.
Templates may be archived automatically when an operating system becomes deprecated, removed from the licensing server, or during system upgrades (for example, during the EasyDCIM update from 1.23 to 1.24). Templates can also be archived manually directly from the Provisioning Templates list view.
Archived templates are read-only and cannot be used for new provisioning tasks. All configuration data, scripts, and metadata are preserved, along with the archive date and archive reason.
This section helps administrators keep the active templates list clean while maintaining full visibility into historical configurations.
Extension Configuration
The Configuration section allows you to control how OS Installation synchronizes data, manages provisioning tasks, and handles template cache.
-
Automatic synchronization interval (Provisioning Profiles) - Defines how often predefined provisioning profiles are automatically synchronized with the license server in the background.
-
Sync Provisioning Profiles Now - Triggers immediate manual synchronization of provisioning profiles, ignoring the automatic interval.
- Automatic provisioning templates synchronization - Defines how often predefined provisioning templates are automatically synchronized with the license server.
- Sync Provisioning Templates Now - Triggers immediate manual synchronization of provisioning templates.
- Remove stale provisioning tasks after (minutes) - Specifies how long a provisioning task can remain inactive before it is automatically cancelled or removed.
- Automatic template cache cleanup - Enables or disables automatic removal of cached template files.
- Cache retention period (days) - Defines how many days cached template files are kept before being automatically deleted.

